What is Dimm Ram?
1. What is DIMM RAM?
1.1 What is DIMM?
DIMM, short for Dual Inline Memory Module, is a new type of memory module that emerged after the introduction of the Pentium CPU. It was developed based on the Single Inline Memory Module (SIMM). While SIMM provides a 32-bit data channel, DIMM offers a 64-bit data channel. Unlike SIMM, the gold fingers on both ends of a DIMM are not interconnected. Each side has 64 independent pins, allowing each to transmit signals separately. This design meets the need for transmitting more data signals, reduces voltage, and enables larger capacities.
Additionally, DIMM is a physical packaging and interface form of RAM. It integrates multiple dram chips onto a small circuit board with a standard interface (gold fingers), forming the "memory module" that we can purchase, hold in our hands, and install into a computer motherboard. In simple terms, this "memory module" achieves the core functionality of RAM chip packaging through DIMM or its variants.
1.2 The structural and design features of DIMM
DIMM was introduced in the early 1990s alongside the Pentium processor. It addressed the signal integrity issues of SIMM and provided higher data transfer rates. DIMM has two connection edges, each with a row of pins, enabling support for wider data buses.
The earliest DIMMs used a 168-pin connector, supporting a 64-bit data channel. Over time, DIMM technology has evolved, with versions supporting more pins, including 184-pin (for SDRAM), 240-pin (for DDR, DDR2, and DDR3), and 288-pin (for DDR4).
With the introduction of DDR SDRAM, DIMM technology experienced a significant leap forward. DDR SDRAM can transmit data on both the rising and falling edges of each clock cycle, allowing for higher data transfer rates compared to SDRAM. Since then, with each new generation of DDR technology, memory speed, capacity, and energy efficiency have continued to improve.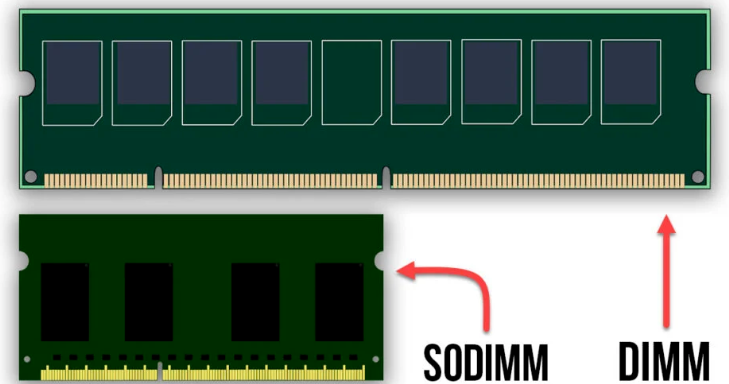
1.3 The relationship between DIMM and RAM
First, RAM (Random Access Memory) is a type of computer memory. Its primary function is to serve as the CPU's "workspace", temporarily storing the operating system, applications, and data currently being processed, enabling the CPU to access them extremely quickly. RAM is volatile, meaning that any data stored in it is lost once power is disconnected.
DIMM (Dual Inline Memory Module) is a physical packaging format and interface standard that encapsulates RAM chips into an independent, removable module, greatly facilitating the installation, upgrade, and replacement of computer memory. DIMM serves as the physical carrier for RAM. In the vast majority of modern desktop computers, workstations, and servers, RAM chips are installed on DIMM (Dual In-line Memory Module) modules.
When you purchase or discuss "memory modules," the physical long strip you hold in your hand is a DIMM (or its variants, such as SO-DIMM). The core purpose of DIMM is to provide RAM functionality. DIMM itself is a physical carrier and interface standard, and its value lies in the fast temporary storage capability provided by the RAM chips integrated on it. It is worth noting that the DIMM standard has evolved in tandem with the development of RAM technology.
2. Types of DIMM
2.1 The mainstream types of DIMM
(1) UDIMM
An unbuffered DIMM, which is a memory module without a cache, is a memory module that lacks a buffer or register on its PCB. Its primary operating principle is that all signals are transmitted directly from the memory controller to the DRAM Q chips, resulting in low signal transmission latency and high performance. However, this very feature makes Unbuffered DIMMs less stable than memory modules with registers. As a result, Unbuffered DIMMs are generally not used in servers and are instead suitable for desktop PCs with lower performance requirements.
(2) RDIMM
Registered DIMM, or Registered Double Inline Memory Module, is a type of synchronous dynamic memory with parity checking. It features integrated circuit chips on the memory module PCB that enhance current drive capability, thereby significantly increasing the memory capacity supported by servers.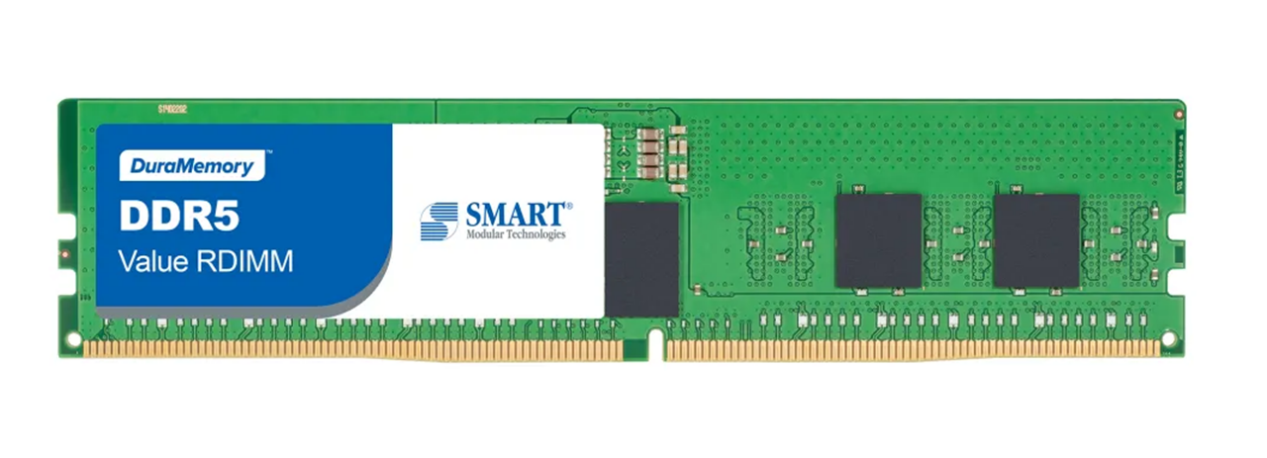
Like FB-DIMM, RDIMM is primarily targeted at high-end server or workstation markets. Compared to other memory modules, RDIMM incorporates two key components: a PLL and a register. RDIMM adds a register on the memory module for data transmission, positioned between the CPU and memory chips. This reduces the distance for parallel data transmission while ensuring the integrity of parallel data transfers. The address and control signals of RDIMMs are registered, and the clock signal is locked via a PLL. Compared to UDIMMs, RDIMMs offer greater stability and higher capacity, but individual read/write accesses are delayed by one clock cycle.Registered memory has two operating modes: Registered mode and Buffered mode.When operating on a motherboard that supports Registered mode, Registered memory operates in Registered mode. In this mode, the address signals and control signals from the motherboard arrive at the DIMM one clock cycle earlier than the data signals. After being sent to the Register chip, they remain there for one clock cycle. They are then output from the Register on the rising edge of the next clock signal, simultaneously transmitting to the SDRAM along with the data signals arriving at the DIMM from the motherboard at the same time.When Registered memory operates on a standard motherboard, it is in Buffered mode. In this mode, all signals arrive at the DIMM simultaneously and are transmitted to the SDRAM simultaneously. The Register chip functions as a simple buffer, with its input and output directly connected, serving only to improve the address signals and control signals. Its timing is the same as that of Unbuffered memory."Since ECC is essential in high-end devices, current Registered memory modules are generally ECC-type modules. Therefore, Reg-DIMM modules are primarily used in the server and workstation markets based on the IA architecture.
(3) LRDIMM
Load-Reduced DIMM (Load-Reduced DIMM) reduces the workload of the memory controller by buffering data and address channels using isolated memory buffer (iMB) technology.Unlike the registers on RDIMMs, the iMB chip also buffers data signals, while the latter only buffers commands, addressing, and clock cycles. The iMB chip isolates all electrical loads, including the data signals from the DRAM chips on the DIMM, from the memory controller. As a result, the memory controller only sees the iMB and not the DRAM chips. The memory buffer then handles all reads and writes to the DRAM chips, thereby improving capacity and speed.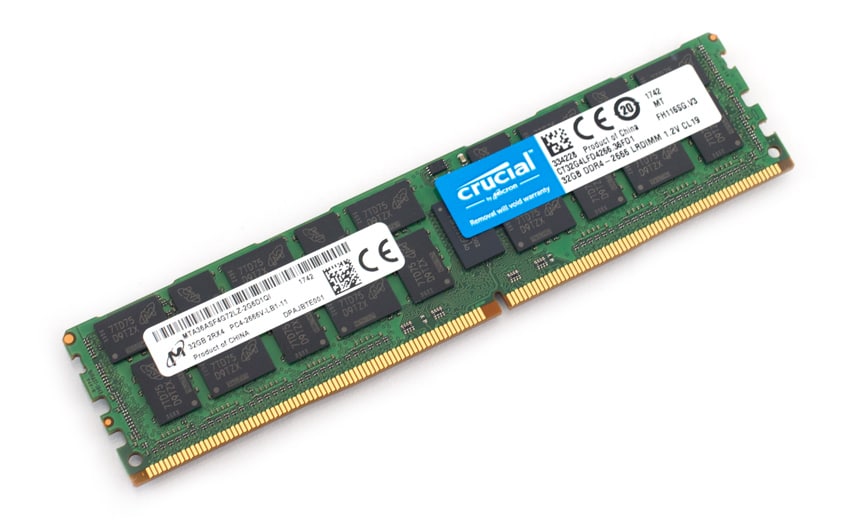
(4) SO-DIMM
The full name is Small Outline DIMM, which stands for Small Outline Dual In-line Memory Module. Its dimensions are smaller than those of a standard DIMM, approximately half the size of a standard DIMM, and can be understood as a smaller version of a memory module. UDIMM and RDIMM are both types of DIMM, and their length, including the signal distribution of the gold fingers, is the same.
Primarily designed for the laptop market, SO-DIMMs were developed to meet the high memory size requirements of devices such as laptops and industrial control computers. Depending on the memory specifications, SO-DIMMs can be further categorized into types such as SDRAM, DDR, and DDR2 DIMM modules.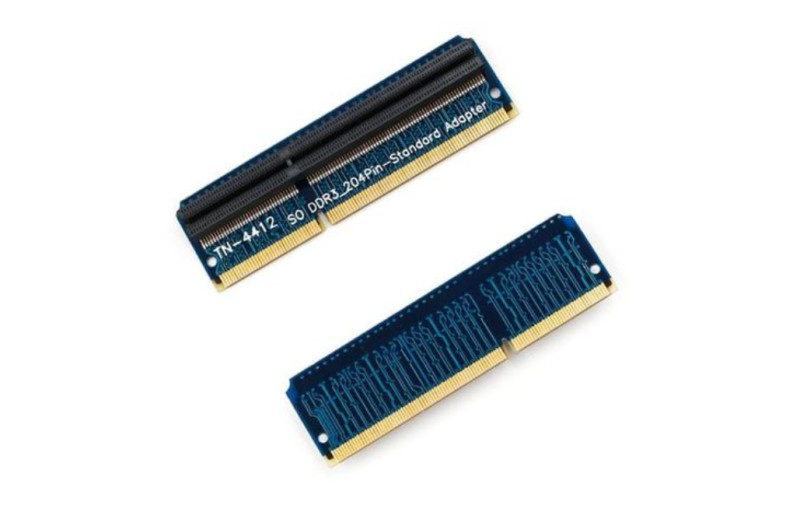
(5) MicroDIMM
MicroDIMM is an ultra-compact memory module designed specifically for use in portable devices with limited space. Its size is tiny, more than half the size of a typical notebook memory SODIMM, with a thickness of just 1.2mm (for some models), making it ideal for ultra-thin devices. The pins are densely packed and are not compatible with SODIMM or standard DIMM slots. Operating voltages include 3.3V (SDRAM) and 1.8V (DDR/DDR2), which help reduce power consumption in devices. Maximum capacity is limited to 1GB–2GB (DDR2 era) due to physical size constraints.
2.2 The special types of DIMMs
(1) FB-DIMM
Fully Buffered DIMM, also known as fully buffered modules. Unlike unbuffered DIMMs, FB-DIMMs incorporate an additional buffer control chip on the standard DDR2 memory PCB for data transfer and read/write control.
It is primarily targeted at the server market. Its most significant structural feature is the transformation of the existing parallel structure based on registers into a serial point-to-point connection. This design addresses the issues arising from increased memory capacity and delayed speed upgrades in servers. It employs serial technology similar to PCI-Express, with data transmitted in a serial format. Due to the adoption of serial transmission technology, the number of pins in FB-DIMM is significantly reduced. Currently, DDR-2 Reg-DIMM has 240 pins, while FB-DIMM has fewer than one-third of that number. As a result, FB-DIMM has not yet been adopted in personal computers and is primarily used in servers.
(2) UniDIMM
Intel’s "UniDIMM" (Universal DIMM) concept enables the sharing of a single interface specification among DDR3, DDR4, LPDDR3, and even future LPDDR4, allowing for easy replacement and upgrades. This concept leverages the existing notebook memory interface specification SO-DIMM (260-pin) with some adaptations.
The dimensions include the current standard 69.6 × 30 mm and a shorter version with a height of 20 mm.
Intel claims that the UniDIMM system requires no modifications to DRAM memory devices, PHY physical layers, packaging, CPU PHY physical layers, pin layouts, or thermal specifications, and is fully compatible with SO-DIMM. It also has no impact on the operating system, enabling a single motherboard to support multiple configurations with only a new power supply circuit design required. The frequency, performance, and power consumption of UniDIMM DDR3/4 are identical to current general standards. The mobile memory version supports LPDDR3-2133 and LPDDR4-2933, though power consumption will increase slightly.
3. Practical Applications of DIMM
How to properly assemble and upgrade hardware?Here are some key components and steps explained.
3.1 How to Choose Memory Modules
When assembling or upgrading a computer, selecting a memory module that is compatible with the motherboard is crucial. As one of the core components of a computer, memory has a direct impact on system performance and stability. How can you ensure the selected memory module is perfectly compatible with the motherboard?
3.1.1 Understand the Memory Types Supported by the Motherboard
Memory modules have evolved through various generations, including DDR, DDR2, DDR3, DDR4, and the latest DDR5. Each generation has unique specifications and interfaces, which are not compatible with those of previous or subsequent generations. Therefore, it is essential to confirm the memory type supported by the motherboard before selecting a memory module.
Consult the motherboard user manual: The motherboard user manual lists the supported memory types, maximum capacity, and frequency range. This is the most reliable method for determining motherboard memory compatibility. Online motherboard specification search: If the motherboard manual is not available, you can search for the motherboard model and specifications using a search engine to obtain detailed memory compatibility information. For example, if the motherboard only supports DDR4 memory and you mistakenly select DDR5 memory modules, the computer will not function properly. Therefore, understanding and confirming the type of memory supported by the motherboard is the first step in selecting memory modules.
3.1.2 Confirm the memory module slot type
In addition to memory type, the memory module slot type is also a key factor affecting compatibility. Currently, the mainstream memory module slots include DIMM (Dual Inline Memory Module) and SO-DIMM (Small Outline Dual Inline Memory Module), among others.
DIMM slots: Primarily used in desktop motherboards, they are larger and typically offer higher capacity and performance. SO-DIMM slots: Used primarily in laptop motherboards, they are smaller in size and easier to carry and install. When selecting memory modules, ensure that their slot type matches the slots on the motherboard. Otherwise, the memory modules cannot be installed on the motherboard.
3.1.3 Select the appropriate memory capacity based on your needs
Memory capacity is one of the key factors affecting computer performance. For general users, 8GB or 16GB of memory is sufficient for everyday tasks such as office work, entertainment, and light gaming. However, for users engaged in professional graphic design, video editing, or big data processing, a larger memory capacity is essential.
General user requirements: For tasks such as processing simple documents, browsing the web, and watching videos, 8GB or 16GB of memory is sufficient to ensure smooth computer operation. High-performance task requirements: When performing tasks such as graphic design, video editing, or big data processing, a memory capacity of 32GB or higher can provide better performance. For example, when editing 4K videos, large memory allows the software to process materials and effects more smoothly, reducing lag. Therefore, when selecting memory modules, determine the appropriate memory capacity based on your actual needs.
3.1.4 Ensure that the memory module frequency matches the motherboard and CPU
The frequency of a memory module represents its data transfer speed, measured in MHz (megahertz). When selecting a memory module, ensure that its frequency matches the frequency range supported by the motherboard and CPU.
Check the memory frequency supported by the motherboard and CPU: The specifications for both the motherboard and CPU typically list the memory frequency ranges they support. When selecting memory modules, ensure that their frequency is within this range. Avoid performance waste: If the memory controller of the motherboard or CPU limits the actual operating frequency of the memory modules, even if you purchase high-frequency memory modules, you will not be able to utilize their performance advantages fully. Therefore, when selecting memory modules, there is no need to pursue high frequencies without consideration; instead, choose a frequency that is suitable for the motherboard and CPU.
3.2 Steps for installing memory modules
3.2.1 Prepare tools
Before installing memory modules, prepare the following basic tools: a Phillips-head screwdriver and an anti-static wrist strap (or a suitable grounding conductor). This ensures that no damage is caused to the computer components during the installation process.
3.2.2 Open the computer case
Turn off the power, then use a screwdriver to remove the side panel of the case. Locate the memory slot on the motherboard. Generally, the memory slot is located in the central part of the motherboard and is marked with the label "DIMM".
3.2.3 Install the memory module
Align the memory module with the slot, ensuring that the gold fingers (contact surface) are aligned with the grooves in the slot, then apply gentle, even pressure to insert the memory module fully.
A "click" sound indicates proper installation. To remove the memory module, press the latches on both sides of the slot to release the module.
3.2.4 Reassemble the computer case
After installation, reinstall the side panel of the computer case, connect the power supply, and turn on the computer. You can verify that the memory is correctly recognized by checking the POST (Power-On Self-Test) screen.
During the installation of the memory module, be mindful of static electricity that could damage electronic components. Before proceeding, it is recommended to wear an anti-static wristband or touch the metal part of the case to ground yourself. Additionally, ensure that the memory module is compatible with the motherboard; refer to the motherboard manual for specific details.
Once the new memory module is installed, you may encounter issues such as the computer failing to boot or the memory being incorrectly recognized. If the power light is on but there is no display, try reinserting the memory module or checking that other hardware connections are secure. You can use software such as CPU-Z to view the actual parameters of the memory and ensure that it is running at the expected frequency and timing.
3.3 How to determine if DIMM needs to be upgraded
Determining whether a memory DIMM needs to be upgraded and how to do it safely is a crucial step in enhancing computer performance. The following symptoms usually indicate that memory is insufficient and needs to be upgraded:
3.3.1 Frequent system freezes or unresponsiveness
Noticeably slower performance when running multiple programs simultaneously (e.g., browser + office software + WeChat); prolonged "unresponsive" state when switching tasks.
3.3.2 Hard drive light flashing rapidly, computer slowing down
When memory is insufficient, the system frequently uses the hard drive as virtual memory (swap file), causing the hard drive light to flash continuously and accompanied by noise.
3.3.3 Crashing when running large software/games
Professional software (e.g., Photoshop, After Effects, CAD), virtual machines, or large games display "insufficient memory" messages or crash.
3.3.4 Poor multitasking performance
Noticeable lag when opening 20+ browser tabs, running chat tools in the background, and playing music.
3.3.5 Clear upgrade requirements
For tasks such as video editing, 3D rendering, or programming development, 16GB of memory is insufficient and needs to be upgraded to 32GB+.
3.4 How to upgrade DIMM
Before upgrading memory, first determine the maximum memory capacity supported by your computer. Of course, checking the manual is the obvious step, but the simplest method is to use a command line. In the Start menu, type "cmd" to open the Command Prompt. In the window that appears, type "wmic memphysical get maxcapacity" and press Enter.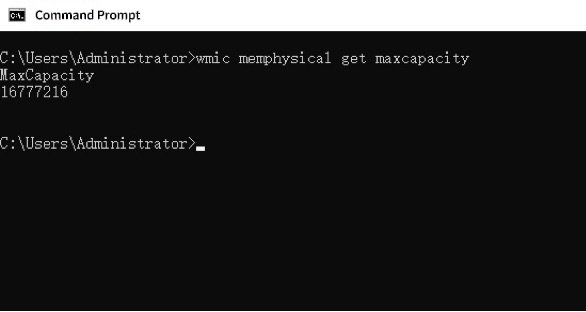
For example, the computer shown in the figure displays a result of 16777216, which means it supports a maximum of 16777216 KB of memory. Converting this to GB, it is 16 GB (1 GB = 1024 MB, 1 MB = 1024 KB). If the current computer has 4 GB of memory, this means that the maximum additional memory capacity that can be expanded on this computer is 12 GB.
Next, you need to choose the memory, which involves issues such as memory generation and memory frequency. How can you distinguish between DDR2, DDR3, and DDR4? The easiest way is to look at the label in the Memory section of the Task Manager. At least in Windows 10, you can view it this way. In Windows 7, you need to use software such as CPU-Z to query it.
Next, you need to understand memory frequency. Here, we can use the "wooden bucket principle." The principle states that the amount of water a bucket can hold is determined by its shortest plank. Upgrading memory works the same way. Whether it's DDR2, DDR3, or DDR4 memory, the system will ultimately run at the frequency of the slowest memory module in use.
Specifically, for DDR2, the maximum capacity per module is typically 4 GB, with 1 GB and 2 GB modules being the most common. The operating frequencies are primarily DDR2-533, DDR2-667, and DDR2-800. For DDR3, the maximum capacity per module is typically 8GB, with 2GB and 4GB modules being the most common. The operating frequencies are primarily DDR3 1066, DDR3 1333, and DDR3 1600; DDR4 modules typically have a maximum capacity of 16GB, with 4GB and 8GB modules being the most common. Operating frequencies primarily include DDR4 2133, DDR4 2666, and DDR4 3200.
For example, if your computer is currently using DDR2 533 memory, and you want to upgrade, whether you purchase DDR2 667 or DDR2 800 memory, the memory will ultimately run at the DDR2 533 frequency. Of course, if you are completely replacing the memory, this is not an issue; ensure that the frequencies match when purchasing in pairs.
Memory upgrade options:
3.4.1 Single replacement:
Replace the existing memory with a single high-capacity module. As long as the specifications match, there are no issues with frequency or compatibility.
3.4.2 Incremental dual-channel setup
Build a dual-channel configuration on top of the existing memory. First, ensure the modules are matched in pairs. It is strongly recommended to choose modules of the same capacity, specifications, and even the same brand to maximize compatibility and stability.
3.4.3 Mixed Memory Upgrade
This applies whether you originally had a single memory module and want to add two more for mixed use, or if you already have a dual-channel setup and purchase a single high-capacity module from Taobao.
When installing memory, there are specific considerations to keep in mind. Two memory modules with the exact specifications must be configured in a dual-channel setup. We recommend installing them in the DIMM1 and DIMM3 memory slots, with the single module installed in the DIMM2 or DIMM4 slot. This setup enables you to enjoy the performance benefits of dual-channel memory while also benefiting from the advantages of larger capacity and improved stability.
Next, we will introduce some common problems and solutions.
3.5 Common DIMM Installation Issues
After installing memory, if the system fails to boot, it is often due to improper assembly or uneven stress, which can cause damage to the memory.
The following are common issues reported when returning memory modules for repair:
(1) If the system still fails to boot after correct installation, try installing each memory module one at a time in the motherboard slots to identify the faulty module. If the issue persists, contact the manufacturer for further assistance.
(2) Cross-check the motherboard's memory slots for issues by installing functional memory modules in different slots from DIMM1 to DIMM4 to confirm that all DIMM slots are functioning correctly.
(3) If you have another motherboard available, install the memory module on a different motherboard to verify functionality. If the issue persists, it is likely due to a problem with the memory module itself.
(4) After using the computer for some time, the "gold fingers" of the memory may become oxidized or dirty, causing the computer not to start up, restart continuously, or freeze. You can use a gold finger eraser to gently clean both sides of the gold fingers, carefully removing any oxidation or dirt.
3.6 How to resolve DIMM compatibility issues
The computer is running unstably. This type of issue is primarily caused by memory compatibility issues. The basic solution is as follows:
First, try moving the memory modules to different slots.
Second, upgrade to a newer operating system. Generally, newer operating systems have better management mechanisms that can better utilize and allocate different hardware models;
Third, if the motherboard supports asynchronous memory operation, force the memory to operate at a lower frequency (based on the lower-spec memory). This method is particularly effective for systems using a copper-core Pentium III CPU with both PC100 and PC133 memory modules.
If system instability occurs due to mixing memory modules with different voltages, check if the motherboard supports adjustable memory voltage. If it does, force the memory voltage to the lowest value among all mixed memory modules via the motherboard or BIOS settings.
3.7 How to diagnose DIMM performance
3.7.1 Assembly Test
Perform basic read/write tests on the assembled memory modules to verify that all pins function normally.
3.7.2 Functional Test
If the memory module passes the Assembly Test, it will proceed to the Functional Test. During this test, various data loads are used to perform write and read tests on the memory chips within the module, verifying the normal status of each chip.
3.7.3 SPD Programming Test
This test involves writing to and reading from the SPD (Serial Presence Detect) chip on the memory module to verify the chip's functionality.
3.7.4 Voltage and Temperature Quadrant Change Test (4 Corner Test)
Adjust the voltage and temperature of the memory module to extreme values to assess its reliability under extreme conditions. There are four different temperature and voltage combinations: Temperature range: Low temperature – High temperature (test temperature varies depending on product specifications and application scenarios); Voltage range (DDR4): Low voltage – High voltage (test voltage varies depending on product specifications and application scenarios); System Integration Test.
In addition to the above tests for individual hardware, depending on the application and context requirements of the memory module, it is still necessary to consider integration testing of the DIMM installed in the entire system, including performance testing and stress/stability testing under different installation combinations (DPC, DIMM per channel). Furthermore, for specific validation requirements, the validation direction must be adjusted, and customized test items (Test Patterns) must be developed to meet the exact reliability validation requirements.
4.DIMM RAM FAQs
-
What is the difference between DIMM and RAM?
First, RAM (Random Access Memory) is a type of computer memory. Its core function is to serve as the CPU's "workspace", temporarily storing the operating system, applications, and data currently being processed so that the CPU can access them extremely quickly. RAM is volatile, meaning that any data stored in it will be lost once the power is turned off.
DIMM (Dual Inline Memory Module) is a physical packaging format and interface standard that encapsulates RAM chips into an independent, removable module, greatly facilitating the installation, upgrade, and replacement of computer memory. DIMM is the physical carrier of RAM. In the vast majority of modern desktop computers, workstations, and servers, RAM chips are installed on DIMM (Dual In-line Memory Module) modules.When you purchase or discuss "memory sticks", the physical long strip you hold in your hand is a DIMM (or its variants, such as SO-DIMM). The core purpose of DIMM is to provide RAM functionality. DIMM itself is a physical carrier and interface standard, and its value lies in the fast temporary storage capability provided by the RAM chips integrated on it. It is worth noting that the DIMM standard has evolved with the development of RAM technology.
-
Is DIMM the same as DDR3?
No, DIMM and DDR3 are not the same concept, but they are closely related. They describe different aspects of memory modules.
DDR3/DDRIII SDRAM (Double-Data-Rate Three Synchronous Dynamic Random Access Memory) is the third generation of double data rate synchronous dynamic random access memory.
DDR3 memory has upgraded its pre-fetch mechanism to 8-bit, combined with an increased interface frequency, resulting in bandwidth that is twice that of DDR2. Through 8-bit pre-fetch, low-voltage design, bank expansion, and signal calibration technology, it achieves a comprehensive upgrade over DDR2, doubling bandwidth while significantly optimizing energy efficiency.
The gold fingers (contact points) are thinner and more densely spaced, supporting high-frequency signal transmission; the operating voltage has been reduced from 1.8V to 1.5V, and asynchronous reset (Reset) and ZQ calibration functions have been added.
Although both have 240 pins, the anti-misinsertion notch of the DDR2 slot is close to the center (64 pins on the left and 56 pins on the right), while the anti-misinsertion notch of the DDR3 slot is slightly shifted to the right, located in the middle-right (72 pins on the left and 48 pins on the right). The interfaces and voltages are also incompatible and cannot be mixed.Due to the addition of new features, DDR3 has undergone a change in pin configuration. 8-bit chips use a 78-ball FBGA package, while 16-bit chips use a 96-ball FBGA package. DDR2, on the other hand, offers three specifications: 60-ball, 68-ball, and 84-ball FBGA packages.
Additionally, DDR3 must comply with green environmental standards and must not contain any harmful substances.The standard operating voltage is 1.5V, with a low-voltage version (DDR3L) at 1.35V. The reduced voltage results in approximately 20-30% lower power consumption and less heat generation, making it suitable for lightweight mobile devices and applications requiring prolonged operation.
Initial production utilized 110nm (0.11 micron) to 90nm process technology, which was gradually updated to more advanced 50-40nm process technology (with Samsung's process being more advanced in later stages). As chip density increased, individual chip capacity grew larger, PCB layer counts rose to 8 layers, and signal routing was optimized to enhance high-frequency stability.
DDR3 overcomes the drawbacks of high CL values through higher frequencies, process upgrades, doubled pre-fetch width (8-bit), and innovative features such as temperature sensors and dynamic ODT, thereby comprehensively outperforming DDR2 memory.
-
Is DIMM the same as DDR4?
DIMM and DDR4 are not the same concept, but they are closely related. In simple terms:
DIMM is the "physical packaging" of memory, while DDR4 is the “technical core” of memory. Here is a clear comparison.
Key differences:
| Characteristics | DIMM | DDR4 |
|
Essence |
Physical appearance and interface standards of memory modules |
Memory chip technology generations and performance specifications |
|
Define content |
Dimensions, number of gold fingers, slot type (e.g., 288-pin) |
Operating voltage, frequency, timing, pre-fetch technology, etc. |
|
Is it dependent on equipment? |
Yes (the motherboard must match the DIMM type) |
Yes (CPU/motherboard must support DDR4) |
|
For example |
The “long memory” form of desktop computers |
1.2V low voltage, high frequency (such as 3200MHz) |
-
Is DIMM RAM better?
The question of whether DIMM RAM is better depends on the specific scenario. DIMM itself is not a standard for measuring memory performance, but rather a physical packaging format for memory modules. Its "quality" depends entirely on your usage requirements and what you are comparing it to.
DIMM positioning: It is the standard format for mainstream desktop computers and servers, and is the standard memory module form for desktop computers, workstations, and servers.
Its advantages include:
(1) High capacity
It can accommodate more memory chips, resulting in higher capacity per module (modern DIMMs can reach up to 128GB).
(2) Effective heat dissipation
The larger PCB area facilitates the installation of heat sinks, making it suitable for high-performance memory.
(3) Strong expandability
Motherboards typically provide 2–8 DIMM slots, making upgrades convenient and straightforward.
When compared to SO-DIMM (small DIMM, used in laptops/mini PCs), DIMM generally offers better performance, larger size, can accommodate more chips, higher frequencies, lower latency, and better heat dissipation. However, SO-DIMM is more portable, which is a compromise necessary for laptops. Therefore, for desktop computers/servers, DIMM is the inevitable choice (with no alternatives); for laptops, SO-DIMM is the only option.
DIMM is not "better" memory; it is the standard form factor for desktop computers/servers. Performance depends on the memory technology it uses (DDR4/DDR5) and specific parameters (frequency/timing/capacity). On devices that support DIMM, you must choose DIMM memory—but this does not mean it is “high-end”; it simply means it is physically compatible with your motherboard.
-
How do I determine what type of DIMM my computer is using?
(1) Command Prompt
Open CMD, type wmic memorychip get MemoryType, and the number in the result corresponds to the memory type (e.g., 24 for DDR3, 26 for DDR4).
(2) Built-in system tools
Task Manager: Right-click the taskbar → "Task Manager" → "Performance" → "Memory", then check "Speed" and "Physical" (DIMM is the common type).
System Information: Press Win+R, type "msinfo32", then go to "Components" → "Memory" to view the model and type.
(3) Third-party software
CPU-Z: After installation, open the program, go to the "Memory" tab to view the type and frequency; go to the "SPD" tab to view slot details.
(4) Physical inspection:
Shut down the computer, disconnect the power, open the case, and check the model and specifications on the memory module label (be careful to avoid static electricity).
-
Can DIMMs of different brands/capacities be mixed?
Mixing memory modules of different specifications, capacities, or brands in a single computer is known as memory mixing. The advantage of memory mixing is that it saves on memory investment, but it also increases the likelihood of system problems. Generally speaking, mixing memory modules of different capacities and brands causes fewer problems, so we will focus on the issues associated with mixing memory modules of different specifications.
(1) Memory mixing also has its principles
Generally, we can install lower-specification, lower-standard memory into the first memory slot (i.e., DIMM1). This approach helps ensure the success of memory mixing and system stability, following the "lower-specification" principle.
(2) Important considerations for memory mixing
Different types of memory cannot be mixed. Generally, different types of memory have significant differences in operating voltage, and this value is far higher than the memory's tolerance. Additionally, the electrical interfaces of different types of memory are significantly different; therefore, they should not be mixed. Even if the motherboard provides two or more memory slots for different types of memory, unless the motherboard has special settings, mixing different types of memory may result in a shortened memory lifespan or even memory failure.
Memory modules of the same type but different voltages should not be mixed. Even memory modules of the same type have different voltages. For example, SDRAM comes in 3.5V and 3.3V versions. Mixing these two different voltage memory modules not only causes system instability but also accelerates the aging or even failure of the lower-voltage memory.
Pay attention to the chipset's support for the number of banks. Most motherboard chipsets impose restrictions on the number of banks supported by DIMM memory slots. This is a key reason why, when using multiple dual-sided memory modules and filling all memory slots, the computer may fail to recognize the total memory capacity or even fail to boot. Generally, when mixing memory modules, if all memory slots are filled, at least one should be a single-sided memory module.
(3) Common issues and solutions for mixed memory installation
The computer cannot boot normally or displays a black screen. There are three main solutions for this issue: First, the simplest and most common solution is to swap the memory modules. Second, if the computer can boot to the BIOS, enter the BIOS and set the corresponding memory settings to the values for low-spec memory.Third, use one of the memory modules to boot the computer, enter the BIOS settings, and force the corresponding memory settings to the values for low-spec memory. After confirming the settings are correct, shut down the computer and insert the second memory module.
Unstable computer performance. The primary cause of this issue is incompatibility with memory. The basic solutions are: First, swap the memory modules again; second, upgrade to a newer operating system. Generally, newer operating systems have better management mechanisms and improved capabilities for managing and allocating different hardware models; Third, if the motherboard supports asynchronous memory operation, force the memory to operate at the specified frequency. This method is particularly effective when using a copper-core Pentium III CPU with both PC100 and PC133 memory modules.
If using memory modules with different voltages results in system instability, check if the motherboard supports adjustable memory voltage. If supported, force-set the memory voltage to the lowest value among all mixed memory modules via the motherboard or BIOS.
(4) The total memory capacity after mixing is different from the value detected by the computer.
There are two main causes for this phenomenon:First, the motherboard BIOS version may be too old, resulting in a maximum supported total memory capacity. Any capacity exceeding this limit cannot be recognized or used. The solution is to download the latest BIOS program for the motherboard and update it. Second, the issue may be caused by the motherboard chipset itself. Some older motherboards only support a maximum memory capacity of 256MB. Any capacity exceeding 256MB cannot be recognized or used. The general solution is to replace the motherboard.
-
Why is server memory more expensive than regular memory?
Server memory is expensive due to its high-performance technical requirements, large capacity demands, market demand and supply constraints, as well as strict requirements for stability and reliability. These factors collectively drive the high cost of server memory. When selecting server memory, users should thoroughly consider their specific needs and budget to ensure optimal server performance and a balanced cost-effectiveness ratio.
- Are DDR4 and DDR5 DIMMs compatible with each other?
DDR4 and DDR5 cannot be used interchangeably. DDR4 and DDR5 are two different memory technologies with significant differences between them.DDR4 is a low-power, high-performance memory technology that offers higher bandwidth, lower power consumption, and faster data transfer rates. DDR5 is a new memory technology that provides even higher bandwidth, lower power consumption, and faster data transfer rates. The interfaces of DDR4 and DDR5 differ, with the primary distinction being the location of the central notch. Therefore, these two types of memory modules are not compatible and cannot be used interchangeably.
-
DDR5 Memory vs. DDR4 Memory Comparison
(1) Performance
If we only consider frequency, a 4800MHz DDR5 memory module has 1.5 times the performance of a 3200MHz DDR4 memory module with the same capacity. However, DDR5 also features additional buffers, resulting in a final performance boost of 1.87 times.
(2) Operating Voltage
For low-power devices, the biggest advantage of DDR5 over DDR4 is its higher energy efficiency. The voltage has been reduced from 1.2V to 1.1V, resulting in lower power consumption. Additionally, DDR5 relocates the PMIC (Power Management IC) from the motherboard to the DIMM, enabling finer-grained power management and reducing the system's overall power consumption.
(3) ECC (Error Correcting Code)
It’s a memory error correction mechanism. During operation, memory may experience 1-bit data flips. Memory with ECC capabilities can actively correct errors, ensuring the system's long-term stable operation.
(4) Increased capacity
This means a higher maximum capacity per memory module, with support for larger individual DRAM modules.
(5) Specifications
DDR5 memory modules come with a capacity of 16GB per module and a frequency of 4800MHz. These specifications mean it outperforms currently available DDR4 memory in terms of performance.
Recommended Reading: